How to add a Downloaded WordPress Plugin
Learn how to add a downloaded WordPress plugin to WordPress and how to add a WordPress plugin directly in WordPress.
What is a WordPress Plugin?
A plugin is like an app for your website. When you add a plugin to WordPress such as Live Chat, it adds more features and functionality to the website. Thousands of free and paid plugins have been created that add more features to WordPress.
You can add a WordPress plugin using various methods. One method is to add a downloaded WordPress plugin by uploading a file and another is to install a plugin directly in WordPress. The other way is to use File Transfer Protocol (FTP), but we won’t get in to that in this tutorial.
How to add a Downloaded WordPress Plugin
To add a downloaded WordPress plugin, you need to download a .zip file from the website you have found/paid for the WordPress plugin.
Log into the WordPress and click on “Plugins” on the side menu and it will take you to the Plugins page.
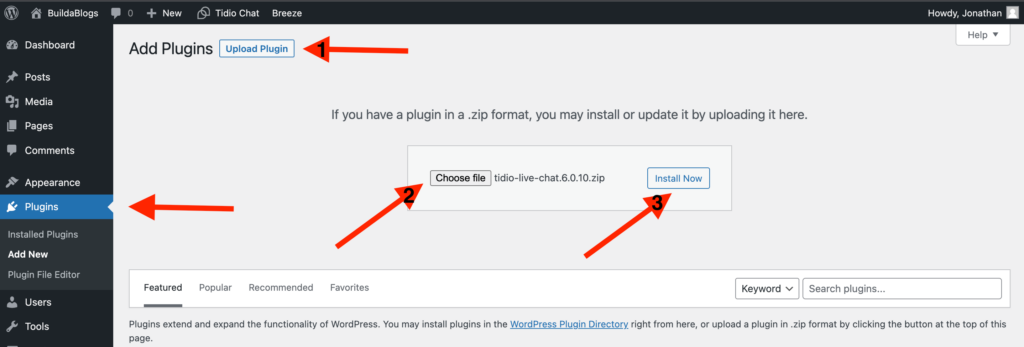
Click “Add New” at the top of the page and then click on “Upload Plugin” (1) on the next page to add a downloaded WordPress plugin.
Next, click on “Choose File” (2) and select the .zip file you downloaded. When the file has loaded (the file name will be next to “Choose File”), click “Install Now” (3) and the plugin will be installed in WordPress.

How to activate an uploaded WordPress Plugin?
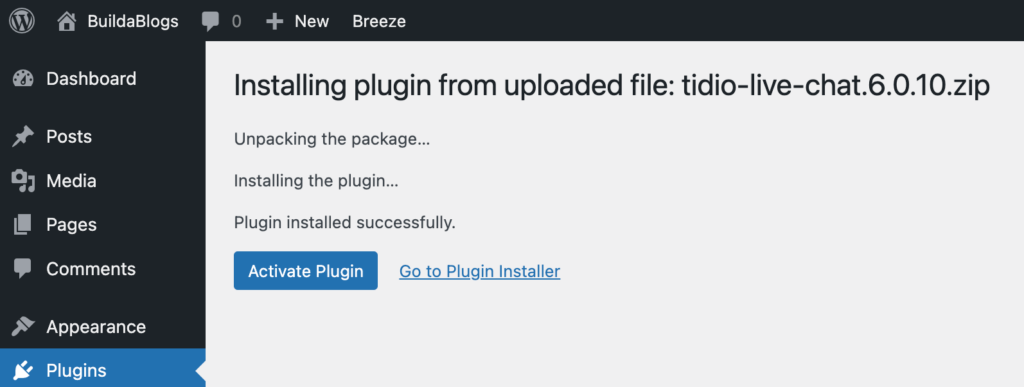
A new page will load, click “Activate Plugin” to make the the plugin live on the website.

You now know how to add a downloaded WordPress plugin to WordPress. Later in the tutorial we will show you how to add a WordPress plugin directly in WordPress.
How to deactivate a WordPress Plugin?
If you want to temporarily turn off a WordPress plugin, you can do this by deactivating it. To deactivate, follow these steps:
- When in the WordPress, click on “Plugins” on the side menu and it will open up the Plugins page.
- Click “Deactivate” on the plugin and it will be deactivated
How to delete a WordPress Plugin?
If you want to remove the plugin completely from your website, follow these steps:
- When in the WordPress, click on “Plugins” on the side menu and it will open up the Plugins page.
- Pick the the plugin you want to delete (the plugin needs to be deactivated first), click “Delete” and click “OK” on the pop up and the plugin will be deleted.
How to add a WordPress Plugin directly in WordPress
It is possible to install many free plugins directly in WordPress, these however are limited to what is on wordpress.org This method has has a few less steps than when you add a downloaded WordPress plugin to WordPress.
First of all log in to WordPress and click on “Plugins” on the side menu. You will then arrive on the Plugins page.
Click “Add New” at the top of the page and then it will take you to the page shown below.
How to search for a WordPress Plugin
Once you have followed the instructions above, you can search for a plugin by using the search box (1). Once you search for a plugin it should display on screen. We will search for Tidio Live Chat.
Click “Install Now” (2) and the plugin will be installed on the website.
Click “Activate” (available after clicking “Install Now”) and the WordPress plugin will be live and active on the website.

Plugins advice
- Keep plugins updated
- Keep the number of plugins to a minimum, try to have no more than 10.
- Delete unused plugins
- Check the plugin is compatible with your version of WordPress – see above
- Check reviews about plugins you about to install – see above
- Check when the plugin was last updated – see above
I hope this tutorial has shown you how to add a downloaded WordPress plugin to WordPress and how to add a WordPress plugin directly in WordPress.
Please check out some of our other tutorials
Thank you
Jonathan @ Buildawebs


