How to Quickly Install WordPress for Free
Learn how to quickly install WordPress for free using a WordPress Web Host. Follow along step by step to install WordPress in a matter of minutes.
To be able to build a WordPress website, you need to install WordPress. There are many different ways to install WordPress, in this tutorial we will show you one of the easier ways to install WordPress by using a web host that does all the hard work for you.
Quickly install WordPress for free using Cloudways
The most straightforward method for WordPress installation is to opt for a hosting provider that installs WordPress for you. Using Cloudways it is possible to install WordPress for free in a few clicks. Cloudways offers a 3 day free trial (No credit card required), where you can try it out and install WordPress on a live website without spending any money.
Why Cloudways?
- Free trial and no Credit Card needed
- Fast page speeds on your website
- Worldclass 24/7, 365 support
- No long-term contracts like other hosts
There are many more reasons to choose Cloudways for hosting your WordPress website, find out more on Cloudways
Follow the below steps to get started installing WordPress
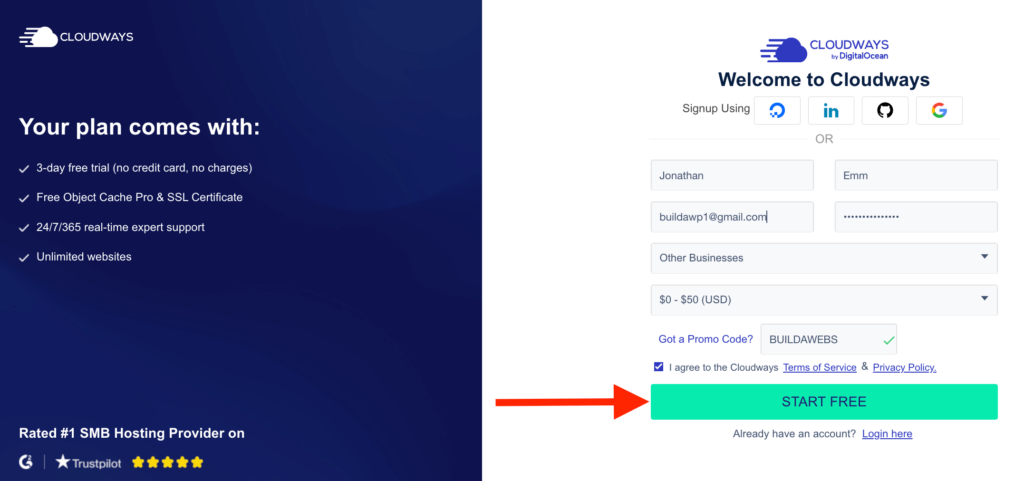
- Click here to get started with Cloudways Hosting
- Click on “START FREE” on the page that loads
- Create an account by entering your details and choose the options that are relevant to you
- Enter BUILDAWEBS in the box next to “Got a Promo Code?” and get 10% off the first 3 months when you start paying for Cloudways
- Agree to the T&C’s and click “START FREE” and you will create an account
Now that you have signed up to Cloudways, activate your account by going to the email account you used to sign up and click on the button in the email sent from Cloudways to activate your account.
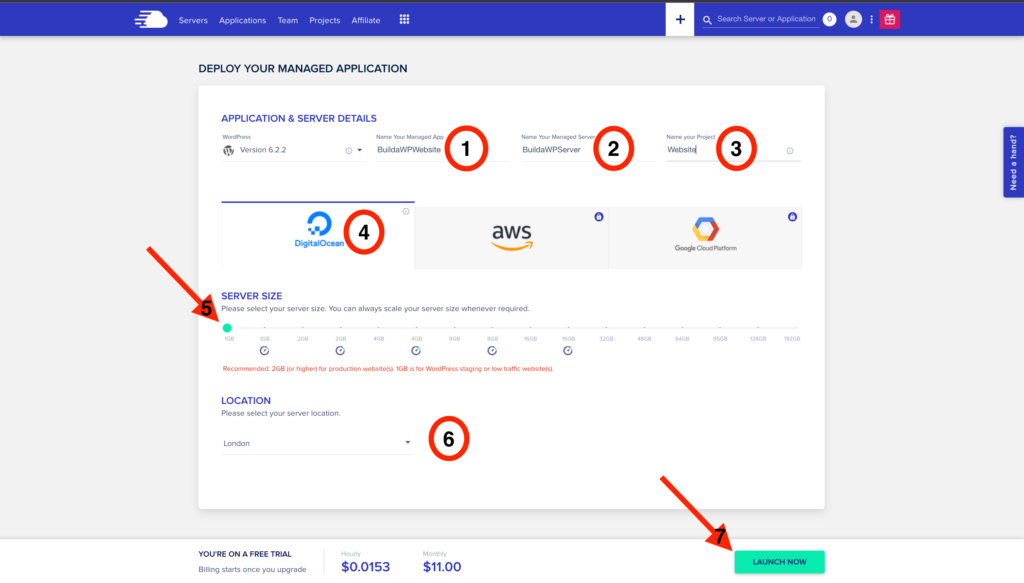
After clicking on the button in the email and activating Cloudways, you will arrive on the below page where you should follow the below steps
- Enter in “Name Your Managed App” (1) with the name of the website you are creating. This can be renamed later.
- Enter in “Name Your Managed Server” (2) with name of the website server. This can be renamed later.
- Enter in “Name your Project” (3) to assign a category against the website/Application. This can be renamed later.
- Choose a Hosting Provider (4). You can choose from multiple hosting providers as shown below.
- Choose a Server Size (5), you can start low (1GB) and scale up as the website gets more traffic. As you move the slider to the right, the price goes up but so does the speed and storage of the website.
If you are just getting started or have a low traffic website, start the lowest value plan and you can scale as you get more visitors.
- Choose a “Location” (6) by clicking the dropdown. Choose the location closest to where the websites target audience will be.
- Click “Launch” (7) and in around 7 minutes Cloudways you will have installed WordPress.
You will be notified on screen when Cloudways has installed WordPress.
How to log in after installing WordPress
Now you know how to quickly install WordPress for free, follow the below steps to log in to WordPress
- Click on “Applications” at the top the page
- Then click on the Application/Website you named earlier

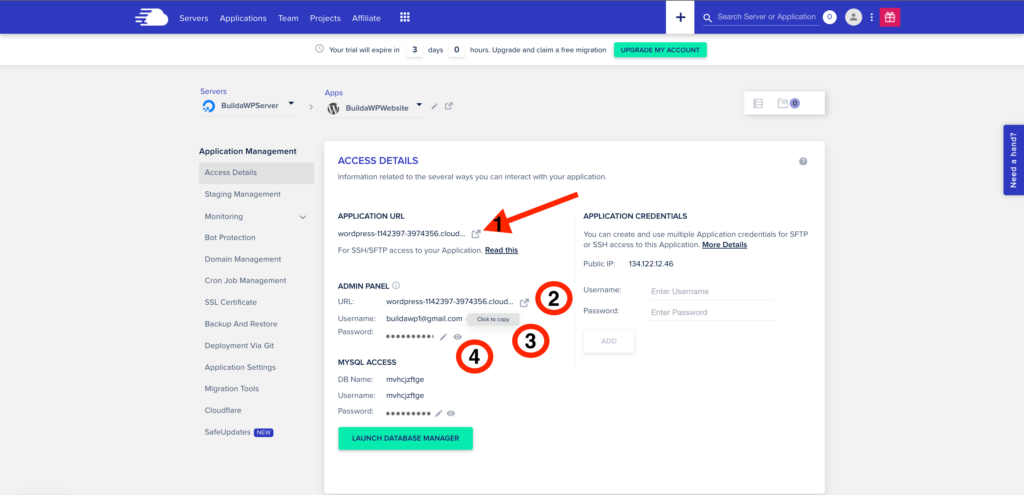
You will arrive on a page where you can see the Login/Access Details. Follow these steps to go to the website and log in
- Click on the arrow (1) next to the Application URL to view the website
- Click on the arrow (2) next to the Admin Panel URL to log in to the admin account of the website. It will open a new page where you will enter the Username and Password from the Login/Access Details.
- Click on “Username” (3) to copy it and then paste it in the “Username” box on the login page
- Click on “Password” (4) to copy it and then paste it in the “Password” box on the login page
- Click “Log In” and it will log you in to the website.
In this WordPress tutorial you have learnt how to quickly install WordPress for free using a WordPress Web Host
Please check out some of our other tutorials
Follow us on
Thank you for reading
Jonathan @ Buildawebs
