Create Blog Posts In Your WordPress Website
Do you want to create blog posts in your WordPress website? Follow along and add posts in WordPress in a matter of minutes.
What are Posts in WordPress?
Blog Posts allow you to publish articles, share news and market products to your audience. They allow your site to be found in search results and drive organic traffic.
Topics covered in this tutorial
- How to create Blog Posts in your WordPress Website
- How to add a Heading to a Post in WordPress
- How to add Text to a Post in WordPress
- How to add a Spacer to a Post in WordPress
- How to add an Image to a Post in WordPress
- How to add Categories to a Post in WordPress
- How to add Tags to a Post in WordPress
- How to add a Featured Image to a Post in WordPress
- How to Publish a Post in WordPress
- How to Edit a Post in WordPress
- How to Unpublish a Post in WordPress
- How to Delete a Post in WordPress
How to create Blog Posts in your WordPress Website
Follow the below steps to create blog posts in your WordPress website
- Log in to WordPress and click on ‘Posts’ on the side menu
- Click on ‘Add New Post’ to create a blog post in WordPress

- Enter what you want to name your blog post where it says ‘Add Title’. We have called the blog post – “How to create Blog Posts”.
- Click on ‘Save Draft’ in the top right to save any changes you have made to the Post
- Click on the WordPress symbol/or your site logo in the top left to return to WordPress
You now know how to create blog posts in your WordPress website. You will learn how to use the built-in page builder that uses blocks to add content such as Headings, Text and Images to a Post.

How to add a Heading to a Post in WordPress
Once you know how to create blog posts in your WordPress website, you can add content to the blog post. Headings play a crucial role in organising and structuring your content, ensuring readability for both visitors and search engines
Follow the below steps to see how you can add a Heading to a Post in WordPress
- Make sure are logged in to WordPress and have the Blog Post you have created visible on screen
- Click + to add a block to the Post
- Search for “Heading” in the search box
- Click on ‘Heading’ and it will be added to the Post

- Click where it says ‘Heading’ and type what you would like to call the Heading. We will type “How to add a Heading to a Post”
- You can format the Heading by clicking on the different options. By clicking H2 (shown above) you can choose the type of Heading. Try out the different options and you can always click ↰ (undo) at the top of the page to reverse your changes.
- Click on ‘Save Draft’ to save any changes
- Click on the WordPress symbol/or your site logo in the top left to return to WordPress
How to add Text to a Post in WordPress
Once you know how to create blog posts in your WordPress website, you can add content to the blog post. If you would like to add text to a Post in WordPress, follow the below steps.
- Make sure are logged in to WordPress and have the Blog Post you have created open on screen
- Click + to add a block to the Post
- Search for “Paragraph” in the search box
- Click on ‘Paragraph’ and it will be added to the Post

- Click where it says ‘Type/to choose a block’ and enter some text. You can see what we have added below.
- Click on ‘Save Draft’ in the top right to save any changes
- Click on the WordPress symbol/or your site logo in the top left to return to WordPress
How to add a Spacer to a Post in WordPress
Once you know how to create blog posts in your WordPress website, you can add content to the blog post. To add space between blocks in WordPress, you need to use the Spacer block. Follow the steps below to add space.
- Make sure are logged in to WordPress and have the Blog Post you have created open on screen
- Click + to add a block
- Search for “Spacer” in the search box
- Click on ‘Spacer’ and it will be added to the Post
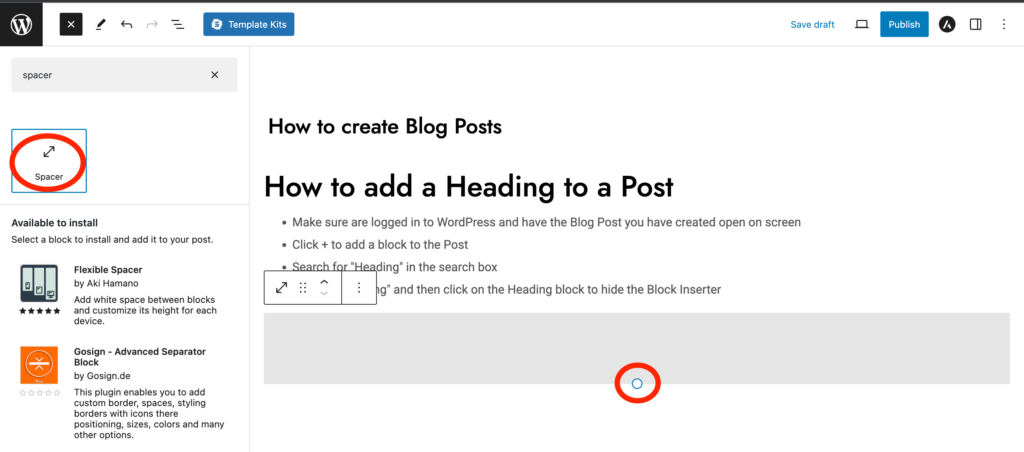
- The Spacer will show on screen, drag the circle up and down to make the space between blocks larger or smaller
- Click on ‘Save Draft’ in the top left to save any changes to the Post
- Click on the WordPress symbol/or your site logo in the top left to return to WordPress
How to add an Image to a Post in WordPress
Once you know how to create blog posts in your WordPress website, you can add content to the blog post. If you want to add images to a Post, follow the below steps
- Make sure are logged in to WordPress and have the Blog Post you have created open on screen
- Click + to add a block
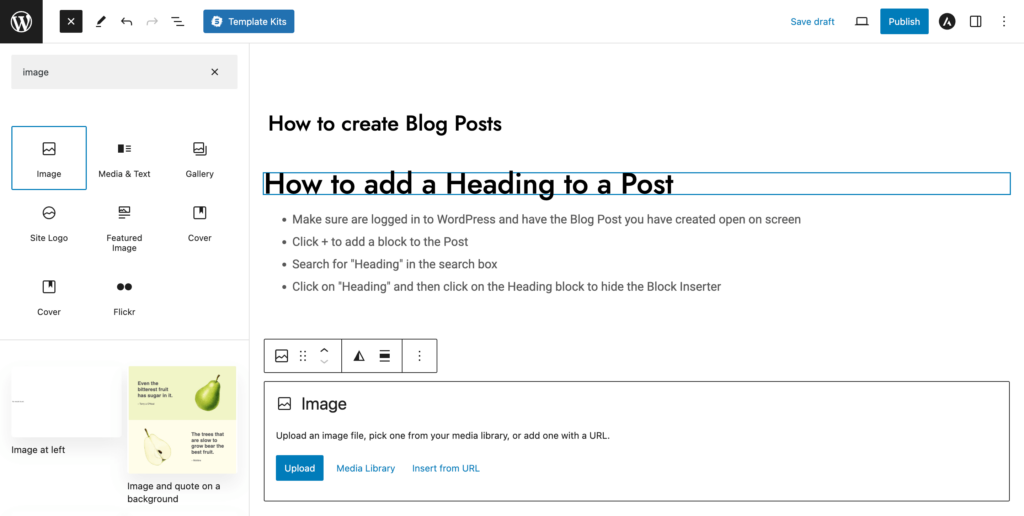
- Search for “Image” in the search box
- Click on ‘Image’
- Choose ‘Upload’ if you want to add an image saved on your computer. Choose ‘Media Library’ if you want add an Image already uploaded to WordPress. We will choose ‘Upload’.
- After selecting the image, it will show in the Post. The image we uploaded can be found here
- Click on ‘Save Draft’ to save any changes to the Post
- Click on the WordPress symbol/or your site logo in the top left to return to WordPress
How to add Categories to a Post in WordPress
Once you know how to create blog posts in your WordPress website, you can add content to the blog post.It is wise to add Categories so you can group blog posts together that are similar. To add categories, follow the below steps
- Make sure are logged in to WordPress and have the Blog Post you have created open on screen
- Click on ‘Settings’ in the top right of the screen. Then click on ‘Post’
- Click on ‘Categories’
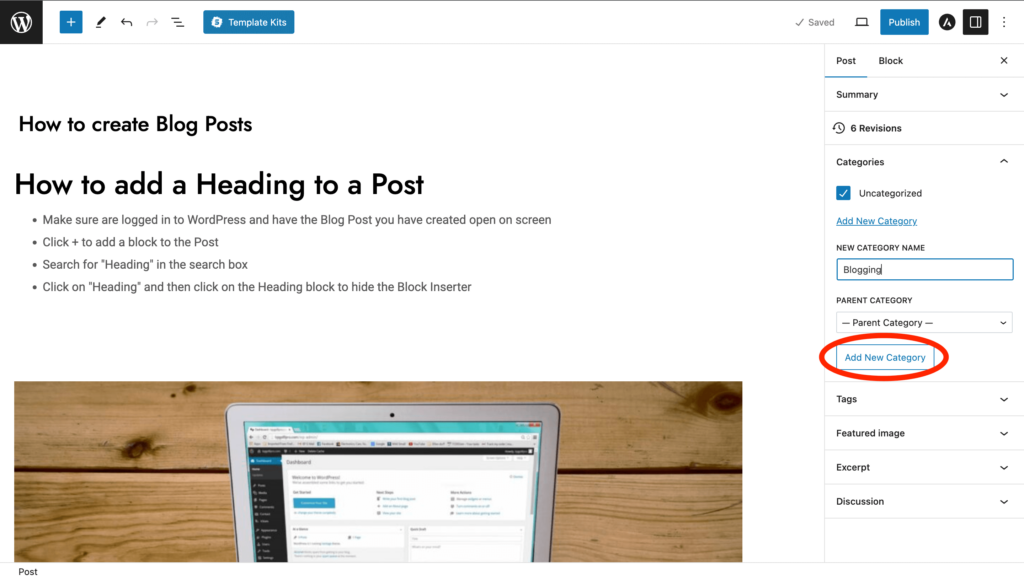
- Click on ‘Add New Category’
- Enter the name of the Category in ‘New Category Name’. E.g. Blogging
- Then click on ‘Add New category’ underneath ‘New Category Name’ to add the Category to the Post
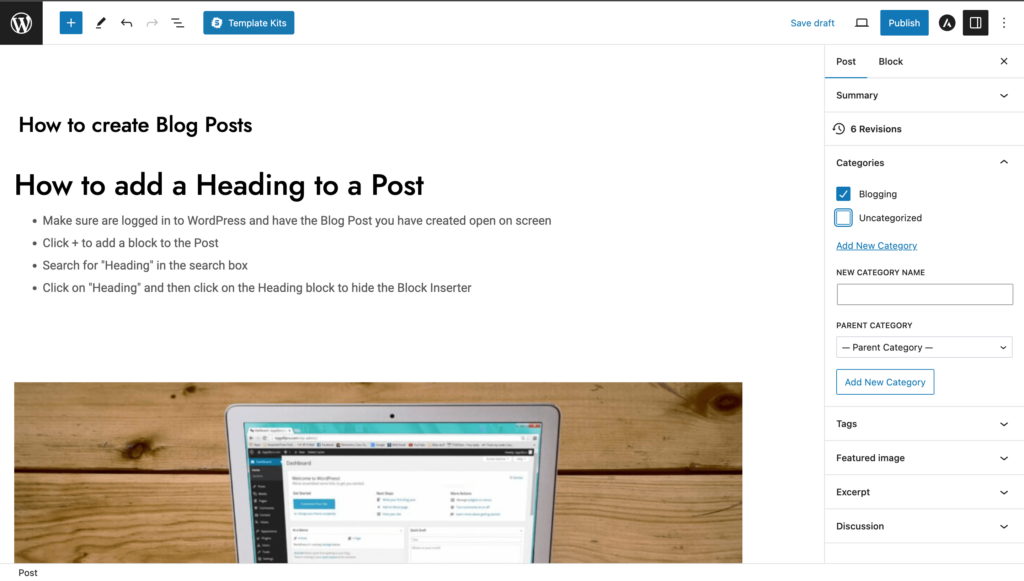
- You can tick/untick Categories to add/remove them from the Post
- Click on the ‘Categories’ section to close that part down
- Click on ‘Save Draft’ to save any changes to the Post
- Click on the WordPress symbol/or your site logo in the top left to return to WordPress
How to add Tags to a Post in WordPress
Once you know how to create blog posts in your WordPress website, you can add content to the blog post. Tags help search engines like google find the keywords in your blog post.
- Make sure are logged in to WordPress and have the Blog Post you have created open on screen
- Click on ‘Settings’ in the top right of the screen. Then click on ‘Post’
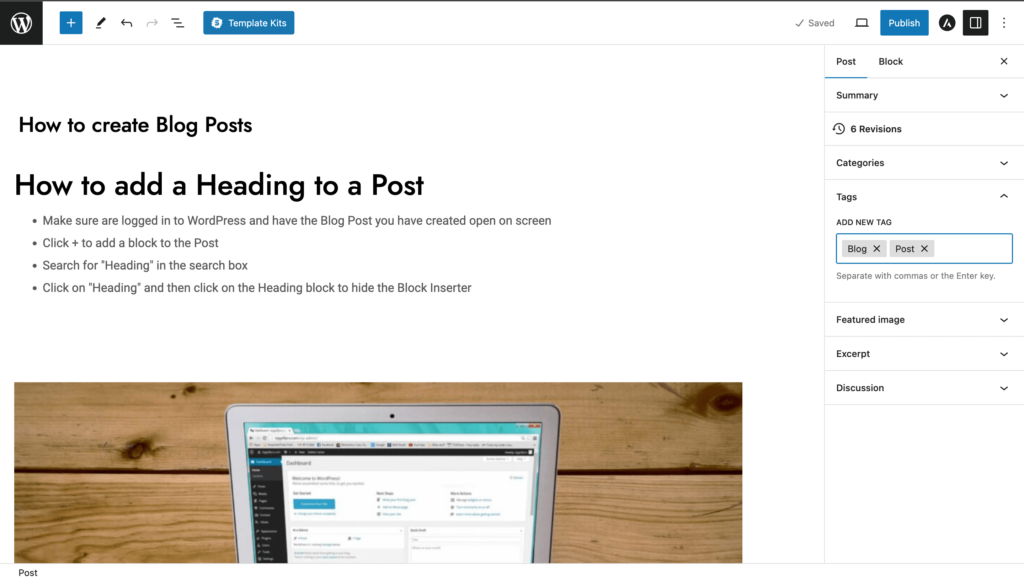
- Click on ‘Tags’
- Enter Tags by typing in ‘Add New Tag’, e.g. Blog. Hit ENTER on your keyboard to add another tag
- Click on the ‘Tags’ section to close that part down
- Click on ‘Save Draft’ to save any changes to the Post
- Click on the WordPress symbol/or your site logo in the top left to return to WordPress
How to add a Featured Image to a Post in WordPress
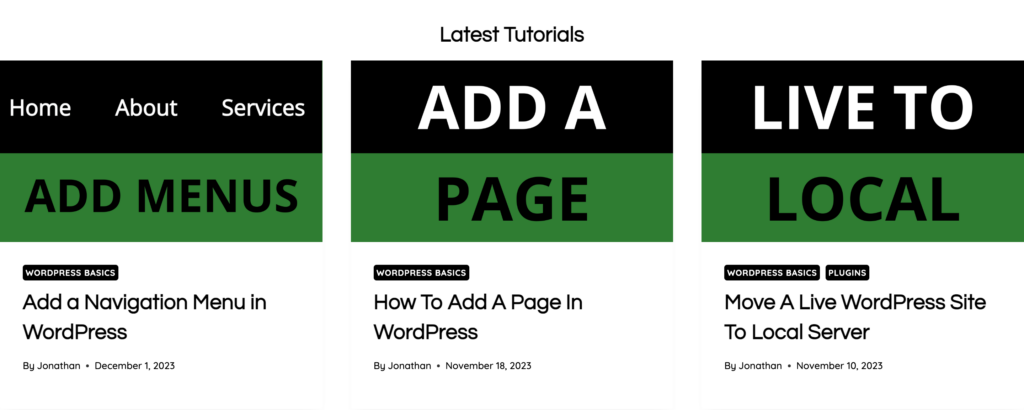
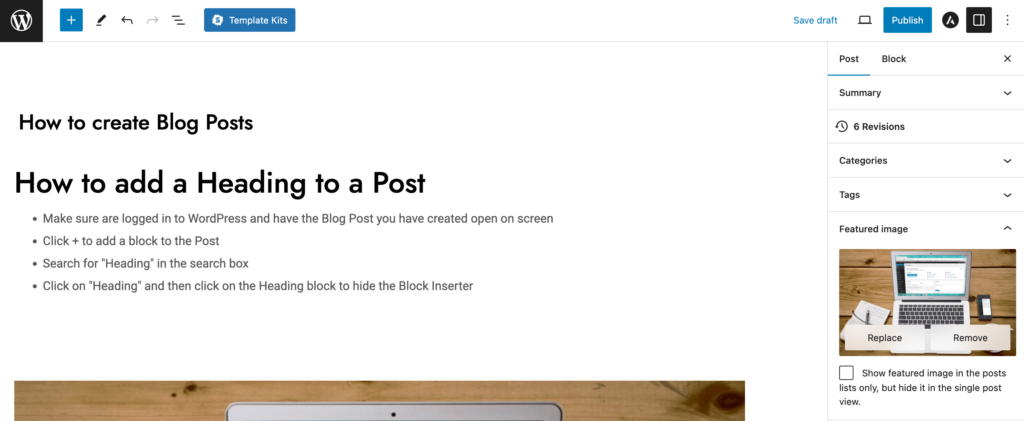
Once you know how to create blog posts in your WordPress website, you can add content to the blog post. A Featured Image is the primary image of a blog post. Featured Images can also be known as post thumbnails and often appear alongside the post’s heading. An Example of a Featured Image is shown below.
Follow the below steps to add a Featured Image to a Post
- Make sure are logged in to WordPress and have the Blog Post you have created open on screen
- Click on ‘Settings’ in the top right of the screen. Then click on ‘Post’
- Click on ‘Featured Image’
- Click on ‘Set Featured Image’
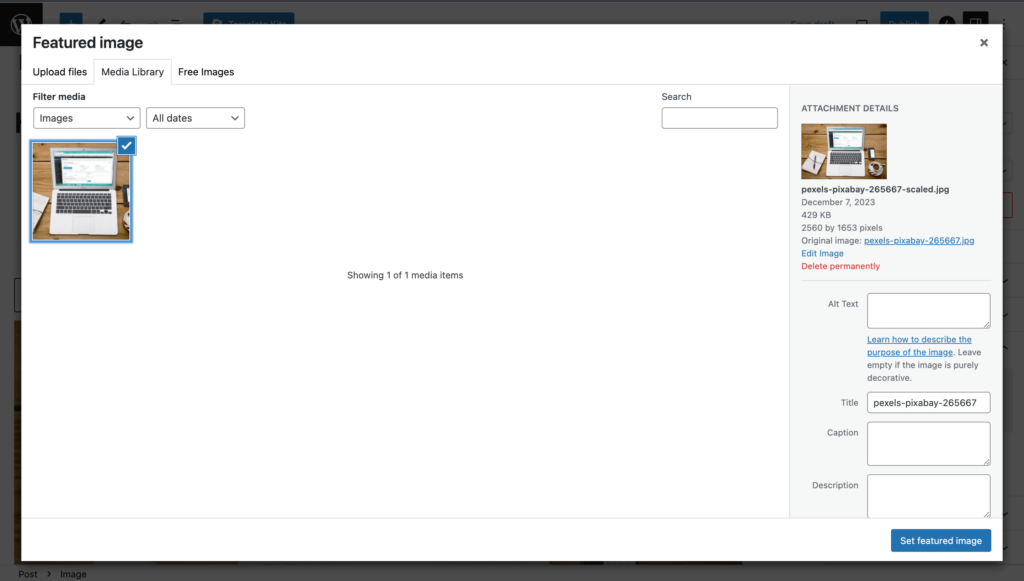
- Click on ‘Media Library’ and then click on an image you want to add to the post. We will choose an image we uploaded earlier in the tutorial.
- Then click on ‘Set featured image’ to add a Featured Image to a Post
- Click on the ‘Featured Image’ section to close that part down
- Click on ‘Save Draft’ to save any changes to the Post
- Click on the WordPress symbol/or your site logo in the top left to return to WordPress
How to Publish a Post in WordPress
Once you know how to create blog posts in your WordPress website, you can add content to the blog post. In order for internet users to see your Post, you need to first publish the Post. Follow the next steps to publish a Post:
- Make sure are logged in to WordPress and have the Blog Post you have created open on screen
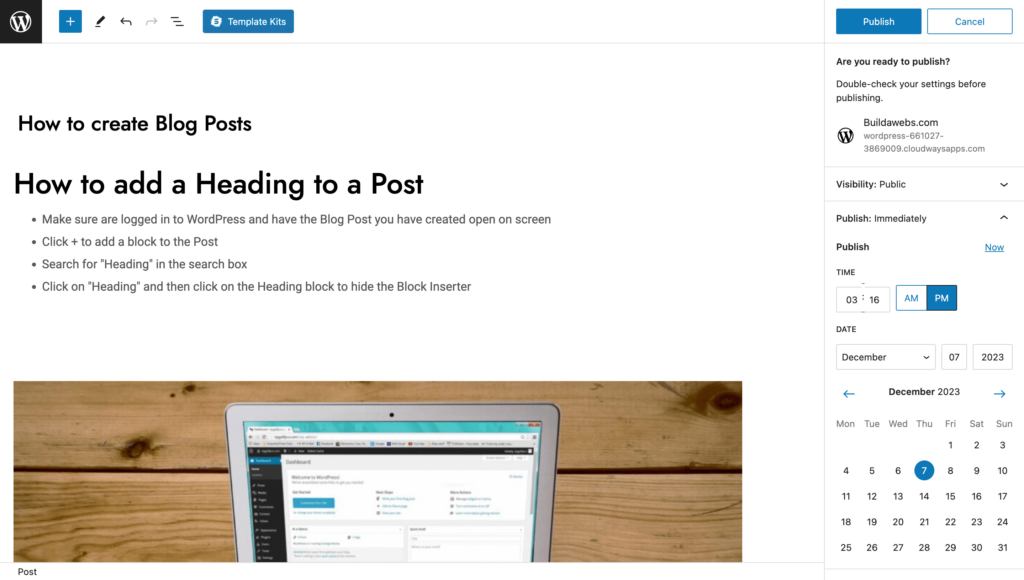
- Click on ‘Publish’ at the top of the Post
- Click ‘Publish’ again if you want to publish the post now.
- Click on ‘Publish: Immediately’ to schedule a blog post to go live in the future. Choose a TIME and DATE, hit enter on your keyboard and you will then be able to click ‘Schedule’ to set the blog post to go live in the future.
- After Publishing, it possible to see what the Post looks like on the website by clicking ‘View Post’
- Click on the WordPress symbol/or your site logo in the top left to return to WordPress
How to Edit a Post in WordPress
Once you have created Blog Posts in your WordPress website, you may want find where the Post is stored in WordPress. To find a Post, follow the below steps
- Make sure you are logged in to WordPress and click on ‘Posts’ on the side menu.
- Find the Post you want to edit and hover over it.
- Click on ‘Edit’ to make changes to the Post.
- Click on the WordPress symbol/or your site logo in the top left to return to WordPress

How to Unpublish a Post in WordPress
Sometimes you may want to stop viewers from seeing a Blog post on your website. Follow the below steps to see how to unpublish a Post
- Make sure you are logged in to WordPress and click on ‘Posts’ on the side menu.
- Find the Post you want to edit and hover over it
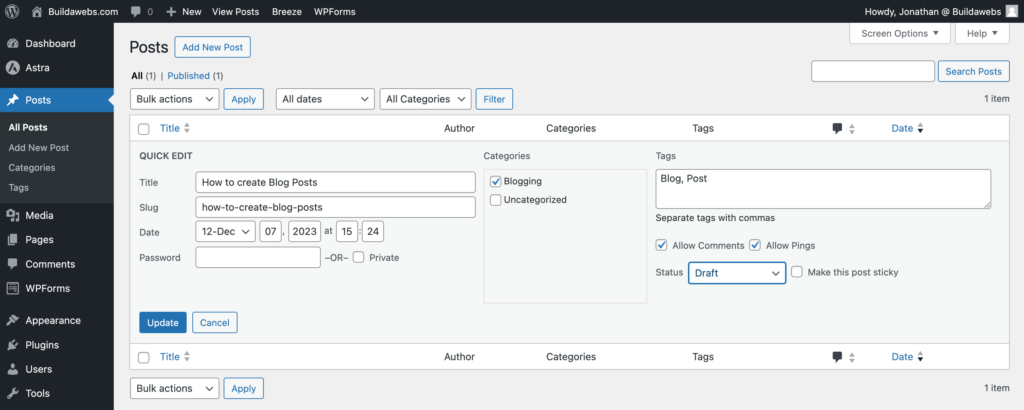
- Click on ‘Quick Edit’
- Change the ‘Status’ from “Published” to “Draft” by using the drop down
- Click on ‘Update’ to save the changes made. You will notice the Post goes from the ‘Published’ folder to the ‘Draft” folder
How to Delete a Post in WordPress
You may want to remove a Blog Post from your website completely. Follow the below steps to a delete a Post
- Log in to WordPress and click on ‘Posts’ on the side menu.
- Find the Post you want to edit and hover over it.
- Click on ‘Trash’ and the Post will move to the ‘Trash’ folder where it can then be deleted from there by clicking ‘Delete Permanently’ or by clicking ‘Empty Trash’.

In this tutorial you have learnt how to create Blog Posts in your WordPress website
Thank you for reading
Jonathan @ Buildawebs
Please check out some of our other tutorials
