Add a Navigation Menu in WordPress
Learn how to add a Navigation Menu in WordPress in this WordPress tutorial for beginners
What is a Navigation Menu in WordPress?
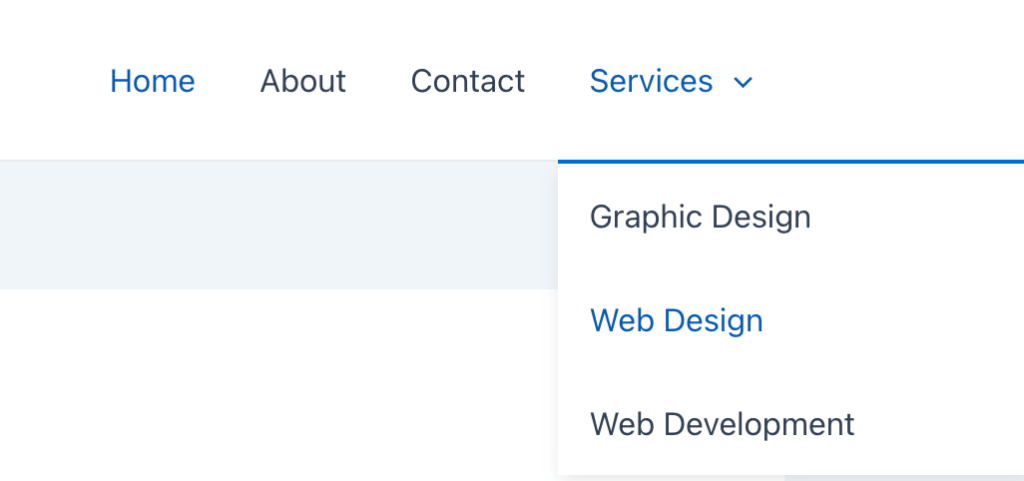
A Navigation Menu is a selection of links which direct users to sections on a website. Typically, these links are displayed in the form of a horizontal bar at the top of each page within a WordPress website. On a Navigation Menu you may find pages such as Home, About, Contact and Services as shown below.
How to add a Navigation Menu in WordPress
In order to display links to other sections on a website in an attractive and organised way, it is essential to add a Navigation Menu in WordPress. Follow the below steps to do just that.
- Log in to WordPress
- Click on “Appearance” on the sidebar and then click on “Menus”. If you cannot see “Menus”, it is probably because the Theme on your website has Full Site Editing (FTE) enabled – we will cover FTE in a future tutorial.
- Give the Menu a name by entering a “Menu Name”. We will call it Main Menu.
- Choose a “Display location”, e.g. Primary Menu. These can vary depending on what Theme you have active on a website, but essentially show where a Menu will be displayed on your WordPress website
- Click on “Create Menu” and you will add a Navigation Menu in to WordPress
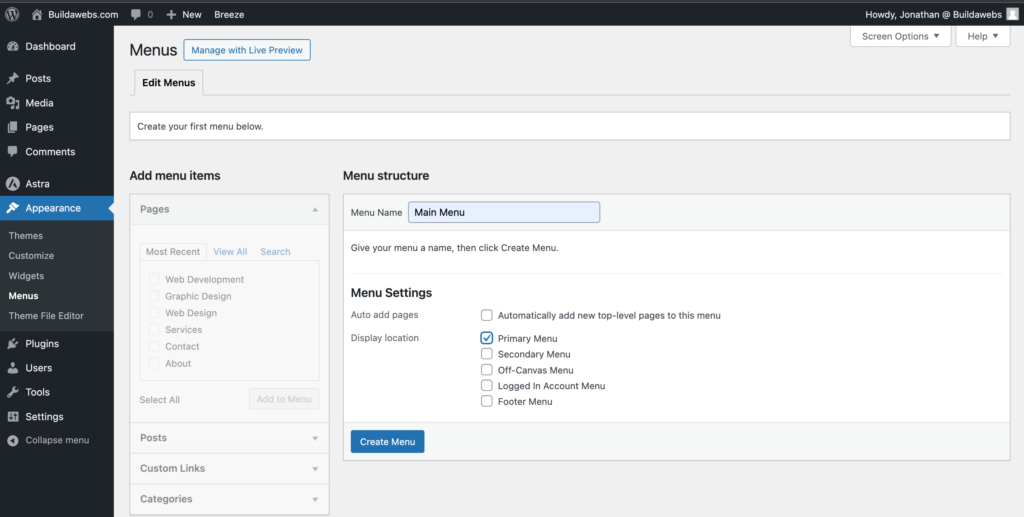
Once you have added a Navigation Menu in WordPress, it is possible to add more Navigation Menus in WordPress by following the below steps
How to add more Navigation Menus in WordPress
If you want to add additional Navigation Menus, follow the below steps
- Make sure you are logged in to WordPress
- Click on “Appearance” on the sidebar and then click on “Menus”. If you cannot see “Menus”, it is probably because the Theme on your website has Full Site Editing (FTE) enabled – we will cover FTE in a future tutorial.
- Click on “Create a new menu” at the top of the Menus page.
- Give the Menu a name by entering a “Menu Name”. We will call it Footer Menu.
- Choose a “Display location”, e.g. Footer Menu. These can vary depending on what Theme you have active on a website, but essentially show where a Menu will be displayed on your WordPress website
- Click “Create Menu” and the additional menu will be added.
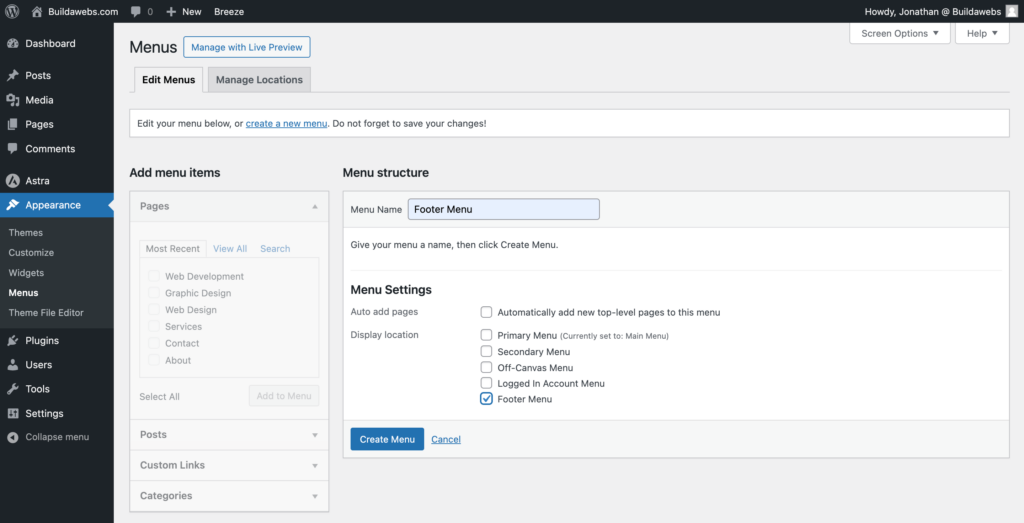
How to choose a Menu in WordPress
Follow the below steps to choose from multiple WordPress Menus
- Make sure you are logged in to WordPress
- Click on “Appearance” on the sidebar and then click on “Menus”. If you cannot see “Menus”, it is probably because the Theme on your website has Full Site Editing (FTE) enabled – we will cover FTE in a future tutorial.
- You will need to have created multiple menus
- Use the dropdown to select a Menu in WordPress
- Click “Select” and the menu will be displayed.
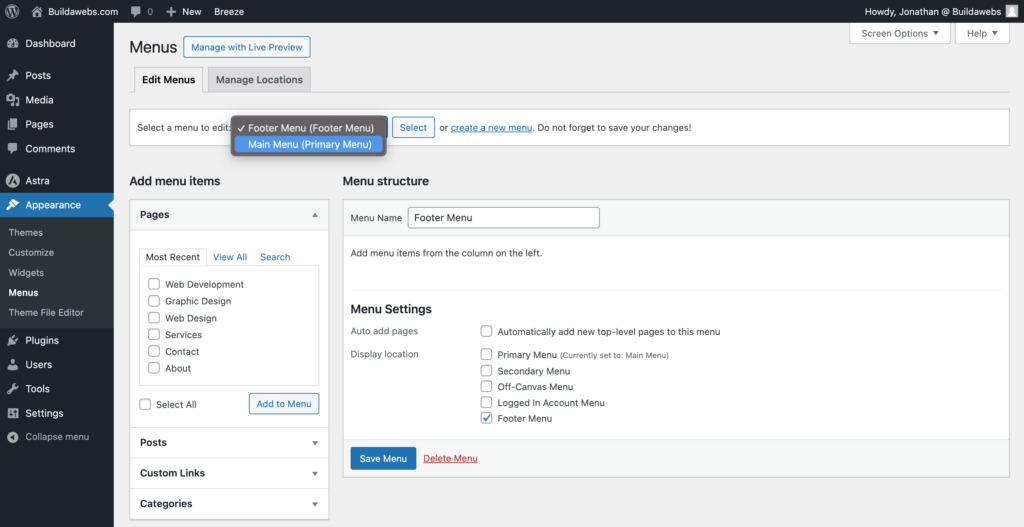
How to Delete a Menu in WordPress
Follow the below steps to delete WordPress Menus
- Make sure you are logged in to WordPress
- Click on “Appearance” on the sidebar and then click on “Menus”. If you cannot see “Menus”, it is probably because the Theme on your website has Full Site Editing (FTE) enabled – we will cover FTE in a future tutorial.
- Choose a menu you have created already or create a menu from scratch here
- Click “Delete Menu” and the WordPress Menu will be deleted
How to add a Page to a WordPress Navigation Menu
Once you know how to add a Navigation Menu in WordPress, you may want to add pages to the menu. Follow the below steps to add a Page to a WordPress Navigation Menu
- Make sure you are logged in to WordPress
- Click on “Appearance” on the sidebar and then click on “Menus”. If you cannot see “Menus”, it is probably because the Theme on your website has Full Site Editing (FTE) enabled – we will cover FTE in a future tutorial.
- Choose a menu you have created already or create a menu from scratch here
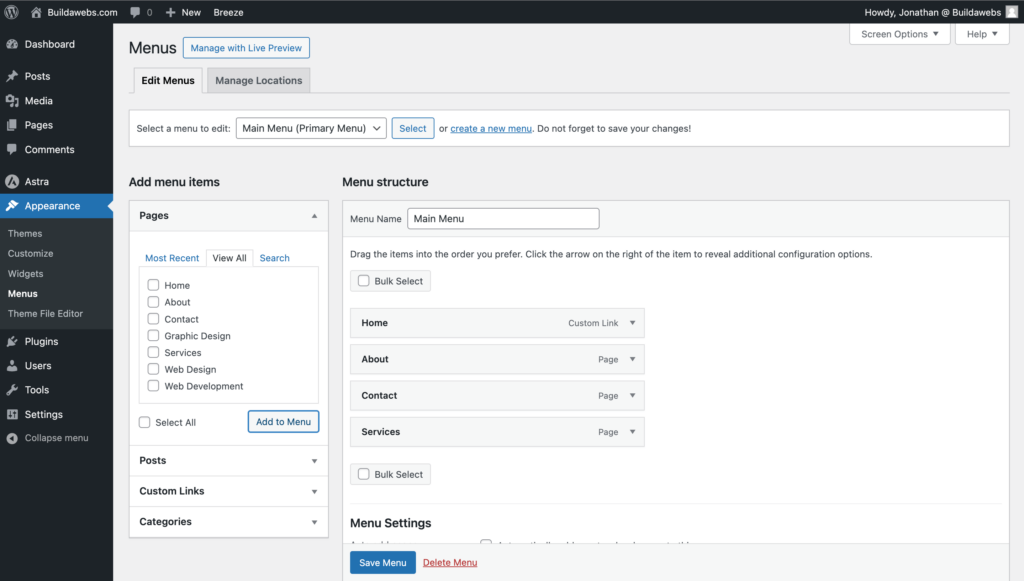
- Click on “View All” under “Pages” once you have chosen/created a menu
- Select the Pages you want to add to the Navigation Menu. E.g. Home, About, Service and Contact. If you want to add all pages to the WordPress Menu, click “Select All”.
- Click “Add to menu” and the pages that have been selected will be added to the WordPress Menu.
- Click “Save Menu” to save the changes to the Navigation Menu.
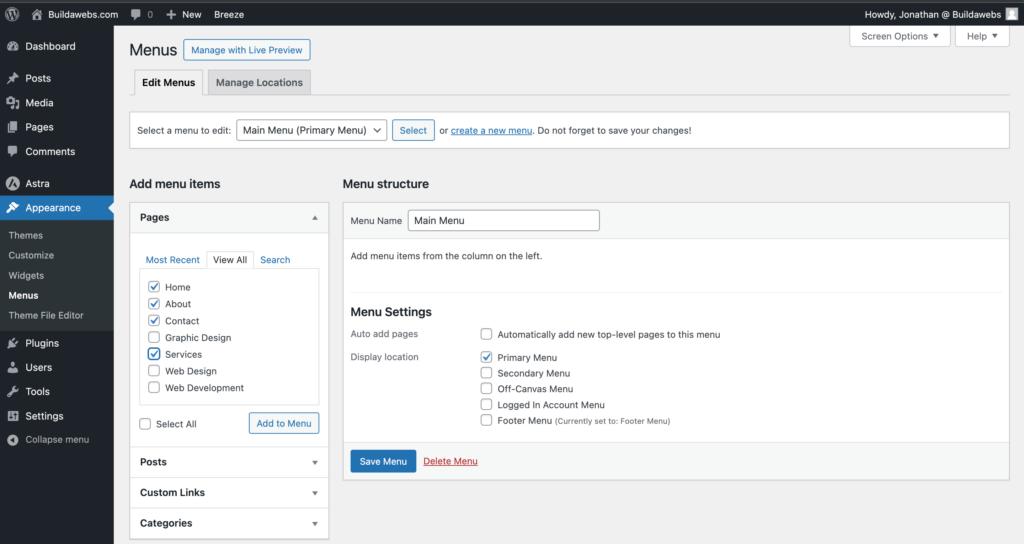
How to rearrange a Menu in WordPress
If you want to change the order of Menu Items such as Pages, follow the below steps. Menu Items such as Pages will display in order of how they appear in the Menu Structure. If the Home page is first on the list, it will display as the first item on a horizontal or vertical menu.
- Make sure you are logged in to WordPress
- Click on “Appearance” on the sidebar and then click on “Menus”. If you cannot see “Menus”, it is probably because the Theme on your website has Full Site Editing (FTE) enabled – we will cover FTE in a future tutorial.
- Choose a menu you have created already or create a menu from scratch here
- Click on the Page/Menu Item you want to rearrange, then drag and drop it above/below another Page/Menu Item to move position on the Menu
- Once you have the Pages/Menu Items where you want them, click “Save Menu”.
How to add drop downs to a Navigation Menu in WordPress
If you would like to add drop downs to a menu in WordPress, follow the below steps
- Make sure you are logged in to WordPress
- Click on “Appearance” on the sidebar and then click on “Menus”. If you cannot see “Menus”, it is probably because the Theme on your website has Full Site Editing (FTE) enabled – we will cover FTE in a future tutorial.
- Choose a menu you have created already or create a menu from scratch here
- Make sure you have created the Pages you want as drop downs and then add the pages to the menu
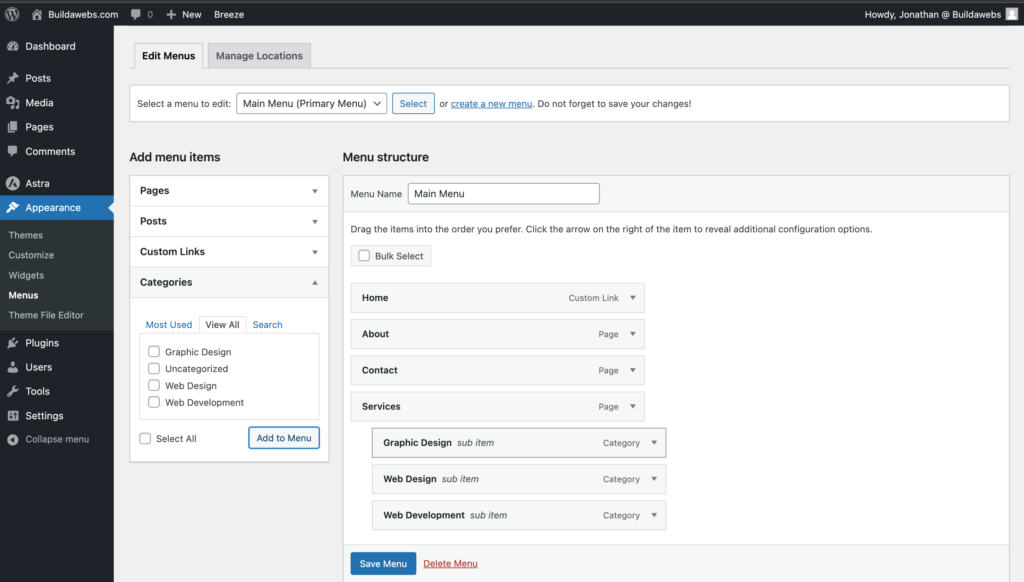
- Select the Page/Menu Item you want to be a drop down and then drag it to the right to indent it. The drop down should be indented like Graphic Design, Web Design and Web Development shown below.
- Click “Save Menu” to save the drop downs to the Menu
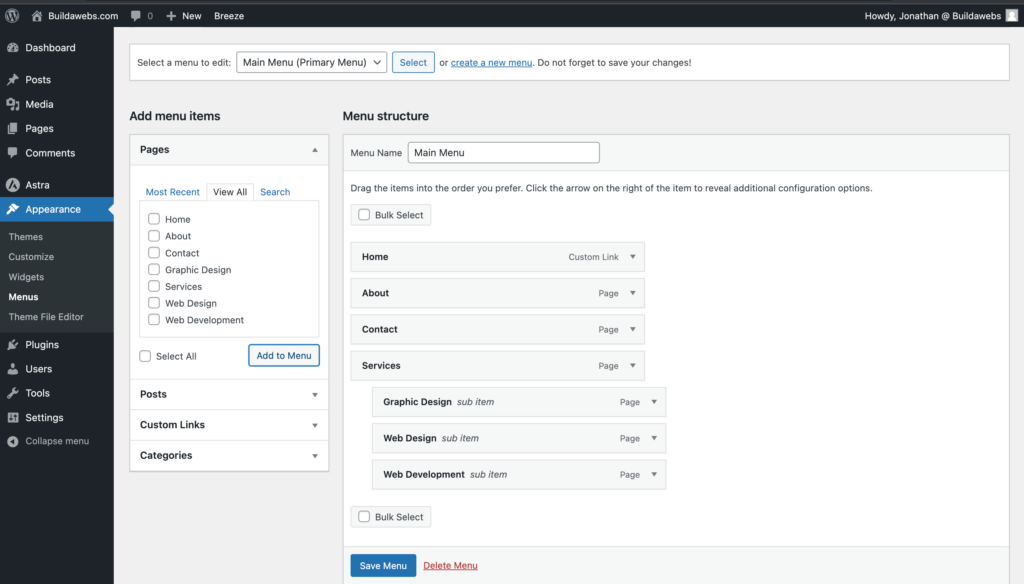
This is how the menu will look when you add drop downs to a Navigation Menu in WordPress

How to Edit/Delete a WordPress Menu Item
Sometimes you may want to make a change to a WordPress Page/Menu Item. You may also want to edit or delete a Page/Menu Item, follow the below steps to do so.
- Make sure you are logged in to WordPress
- Click on “Appearance” on the sidebar and then click on “Menus”. If you cannot see “Menus”, it is probably because the Theme on your website has Full Site Editing (FTE) enabled – we will cover FTE in a future tutorial.
- Choose a menu you have created already or create a menu from scratch here
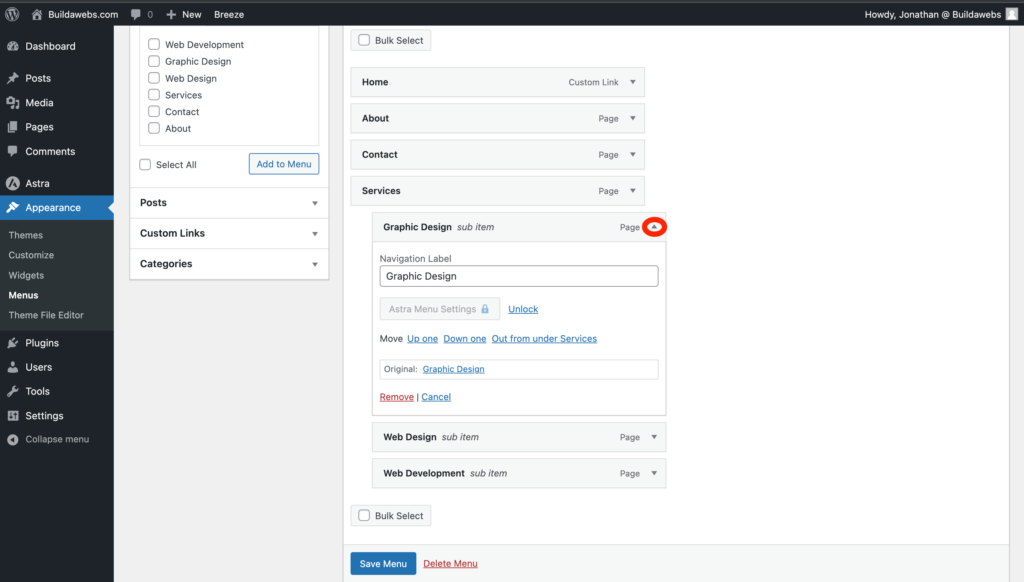
- Click on the downwards arrow on the Menu Item you want to edit/delete
- If you want to change what the Menu Item is called, enter the name in the “Navigation Label”. You can also change the position by choosing the options next to “Move”.
- Click “Remove” to delete a Menu Item.
- Click “Save Menu” to save the changes to the Navigation Menu.
We will delete all drop downs by following the above steps.
How to add Categories to a WordPress Navigation Menu
You may want to display Post Categories to a WordPress Menu, to do that follow the below steps
- Make sure you are logged in to WordPress
- Click on “Appearance” on the sidebar and then click on “Menus”. If you cannot see “Menus”, it is probably because the Theme on your website has Full Site Editing (FTE) enabled – we will cover FTE in a future tutorial.
- Choose a menu you have created already or create a menu from scratch here
- Click on “Categories” once you have chosen/created a menu
- Click on “View All” under “Categories”
- Select which Categories you want to add to the Navigation Menu. If you want to add all Categories to the WordPress Menu, click “Select All”.
- Click “Add to menu” and the Categories will be added to the WordPress Menu.
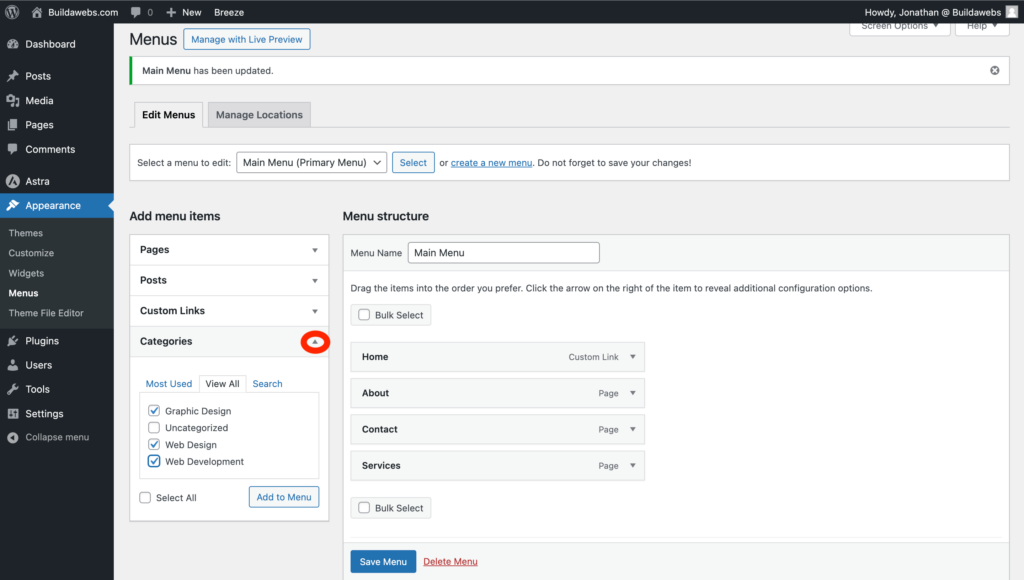
- After adding the Categories to the menu, it is possible to rearrange the items by dragging and dropping them.
- It is also possible to add the Categories as drop downs. To select the Category as a drop down, drag the Category to the right to indent it.
- Once you have the Categories where you want them, click “Save Menu” to save your changes.
How to add Custom Links to a WordPress Navigation Menu
You may want to add a link to a WordPress Menu that sends visitors to a page on your website or to another website. We will add a link to Twitter/X.
- Make sure you are logged in to WordPress
- Click on “Appearance” on the sidebar and then click on “Menus”. If you cannot see “Menus”, it is probably because your website has Full Site Editing (FTE) enabled – we will cover FTE in a future tutorial.
- Choose a menu you have created already or create a menu from scratch here
- Click on “Custom Links” once you have chosen/created a menu
- Enter a “URL” and “Link Text” of the page you want to Navigate to. We will add “https://twitter.com/buildawebs” in the “URL” and “Twitter/X” in “Link Text”.
- Click on “Add to Menu” to add the Custom Link to the WordPress Menu.
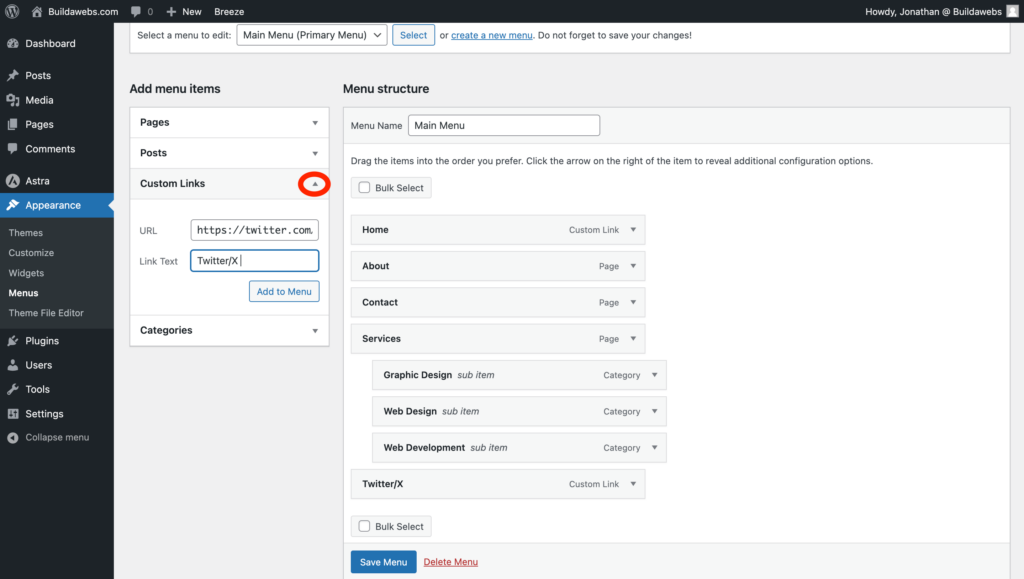
- After adding the Custom Links to the menu, it is possible to rearrange the items by dragging and dropping them.
- Once you have the Menu Items where you want them, click “Save Menu” to save the WordPress Menu.
How to add a Navigation Menu to the Sidebar in WordPress
To add a Navigation Menu to the Sidebar in WordPress you need to have first of all created the Navigation Menu with Menu items such as Pages. You can then follow the below steps if your Theme has Widgets.
- Make sure you are logged in to WordPress
- Before adding a Menu to the sidebar, you need to have created the menu and added Pages etc to the Menu
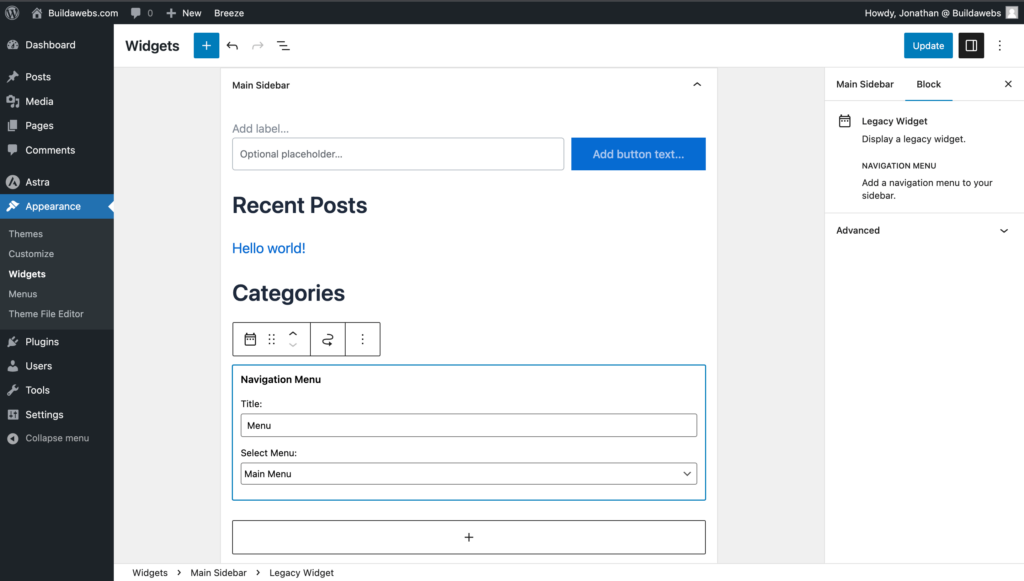
- Go to “Appearance” on the sidebar and then click “Widgets”. You will see all of the Widgets available for the Theme you are using, Widgets available can vary from one Theme to the next. If you cannot see “Widgets”, it is probably because the Theme on your website has Full Site Editing (FTE) enabled – we will cover FTE in a future tutorial.
- Click on the downwards arrow next to the Widget you want to add a Navigation Menu to. We will choose “Main Sidebar”.
- Click on + to add a block to the Widget
- Search for menu
- Click on “Navigation Menu”

- Add a “Title” and choose a menu by clicking on “Select Menu”.
- If you want to preview the menu, click outside of the block
- Click on “Update” to make the changes live on the website
You may need to turn on the Sidebar in the Theme Settings to make the Sidebar Menu visible to website visitors. In quite a lot of Themes, it is possible to turn on the Sidebar in the WordPress Customizer. It is possible to go to the WordPress Customizer by clicking on “Appearance” and then “Customize”.
How to add a Navigation Menu to the Footer in WordPress
To add a Navigation Menu to the Footer in WordPress you need to have first of all created the Navigation Menu with Menu items such as Pages. You can then follow the below steps if your Theme has Widgets.
- Make sure you are logged in to WordPress
- Go to “Appearance” on the sidebar and then click “Widgets”. You will see all of the Widgets available for the Theme you are using, Widgets available can vary from one Theme to the next. IIf you cannot see “Widgets”, it is probably because the Theme on your website has Full Site Editing (FTE) enabled – we will cover FTE in a future tutorial.
- Click on the downwards arrow next to the Widget you want to add a Navigation Menu to. We will choose “Footer Bar Section 1”.
- Click on + to add a block to the Widget
- Search for “menu” and click on “Navigation Menu”
- “Add a Title” and choose a menu by clicking on “Select Menu”.
- If you want to preview the menu, click outside of the Navigation Menu block
- Click on “Update” to make the changes live on the website

The footer should automatically show at the bottom of the website for some Themes. If you are using a theme with a Footer Builder (Like the Astra Theme), you may have to add the Navigation Menu to the footer inside of the WordPress Customizer.
To go to the WordPress Customizer, click on “Appearance” on the sidebar and then click “Customize”. From inside the WordPress Customizer you can add the Navigation Menu to the footer and do much more.
You may find that if the Theme you have active on your website doesn’t have Widgets or a WordPress Customizer, the Theme is likely to have Full Site Editing.
The Full Site Editor was released in WordPress 5.9 and allows you to customize your theme by using the Block Editor. We won’t be covering the Full Site Editor in this tutorial, but we will be adding a tutorial that covers it in the future.
In this tutorial you have learnt how to add a Navigation Menu in WordPress.
Thank you for reading
Jonathan @ Buildawebs
Please check out some of our other tutorials
