Move WordPress from Local Server to Live Website
Learn how to move WordPress from local server to live website in a matter of minutes in this WordPress tutorial for beginners.
In this tutorial we will show you how export a WordPress website from your local server/computer and then import that website into a live website.
Do you have hosting for your WordPress website?
In order to move WordPress from local server to live website, you need WordPress hosting. Hosting allows other internet users to see your website.
You can follow this tutorial to sign up for hosting for free using Cloudways. Cloudways hosting is the our favourite website hosting site for WordPress.
Why Cloudways?
- Free trial and no Credit Card needed
- Super fast page speeds on your website
- Worldclass 24/7, 365 support
- No long-term contracts like other hosts
There are many more reasons to choose Cloudways for hosting your WordPress website, find out more on Cloudways
Once you have WordPress hosting, you can continue on with this tutorial
How to move WordPress from local server to live website
To move WordPress from local server to live website you need to install a plugin. You can then export your local website to your computer and then import the exported website to your live website.
Install the All-in-One WP Migration plugin
A great way to move WordPress from local server to live website is to install the All-in-One WP Migration plugin. You will need to install the plugin on your local website and then install the same plugin on your hosted WordPress website.
Follow the steps below to install the All-in-One WP Migration on your local website and then repeat the steps for your hosted website.
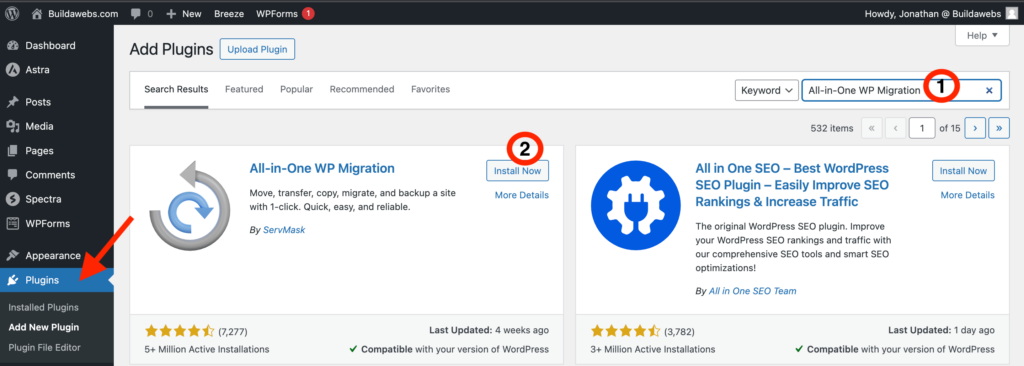
- First of all log in to WordPress and click on “Plugins” on the side menu. You will then arrive on the Plugins page.
- Click “Add New” at the top of the page and then it will take you to the Add Plugins page.
- Once you have followed the instructions above, search for a plugin by using the search box (1) and it should display on screen. We will search for All-in-One WP Migration.
- Click “Install Now” (2) and the plugin will be installed on the website.
- Click “Activate” (available after clicking “Install Now”) and the WordPress plugin will be live and active on the website.
Export local website from local server
Next we will export the local website from the local server and then later import it into the hosted website we created earlier in Cloudways. Please make sure you have installed the All-in-One WP Migration plugin so you can do the next steps.
Follow these steps to export your local website from a local server:
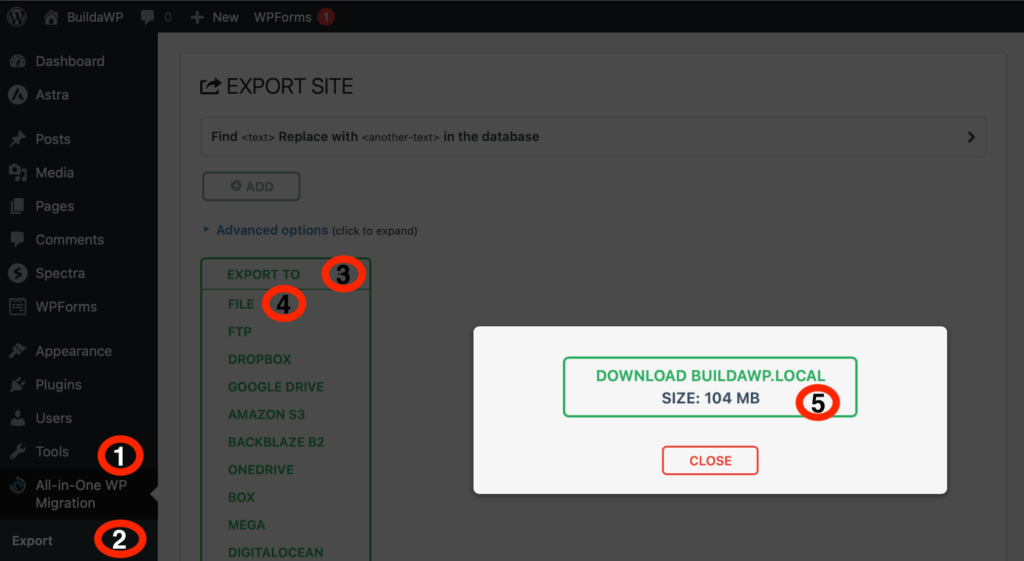
- Click on All-in-One WP Migration (1) on the side menu. Then click on “EXPORT”(2).
- Click on “EXPORT TO”(3) and choose “FILE”(4). After a few moments, click on “Download”(5) and the file will be downloaded to your computer.
Import local website to live website
Next we will import the local website into the live website. Please make sure you have installed the All-in-One WP Migration plugin so you can do the next steps.
WARNING! The import process will overwrite your website including the database, media, plugins, and themes. Please ensure that you have a backup of your data or you don’t mind it being overwritten before starting the next step.
Follow the next steps to import your local website:
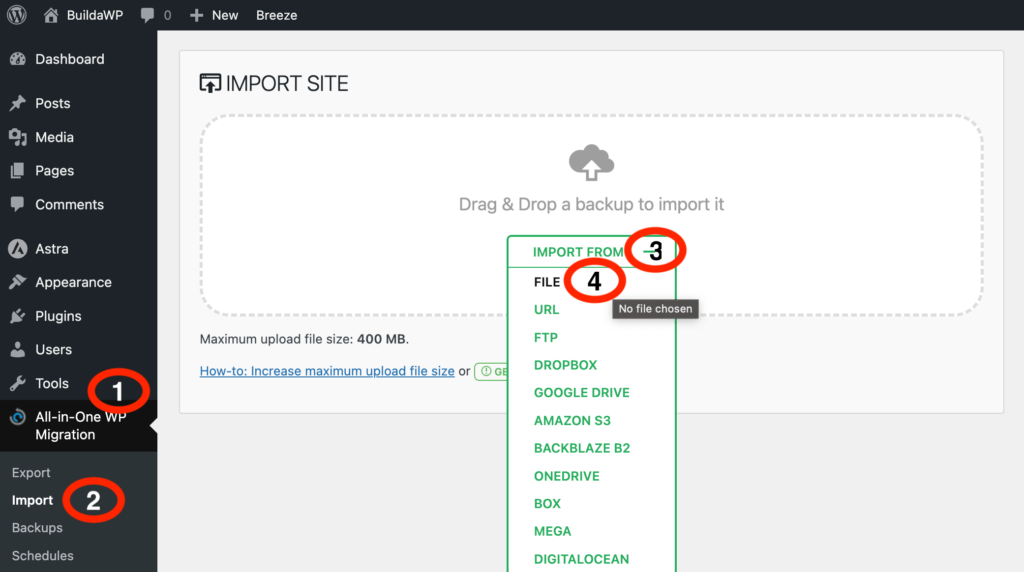
- Click on “All-in-One WP Migration” (1) on the side menu. Then click on “IMPORT” (2).
- Click on “IMPORT FROM” (3) and choose “FILE” (4). Choose the file you downloaded earlier and then it will start to be imported.
If you get the following message when attempting to import, then you need to increase the upload file size. “Your file exceeds the maximum upload size for this site: 100 MB”. If your website is hosted on Cloudways, click here to learn how to increase the upload file size in Cloudways.
- After a few minutes, click “PROCEED” to finishing importing the website. Once the installation has finished, click “FINISH” and then you can view the imported local website.
- To view the website, click on the home button in the top left of WordPress.
Once the page has loaded, you can see how you’ve been able to move WordPress from local server to live website.
How to log in to your live WordPress website
If you want to log in to your live WordPress website, you will need to use the credentials you used to log in to your local website. This is because the details were imported from the local website.
Follow these steps to log in:
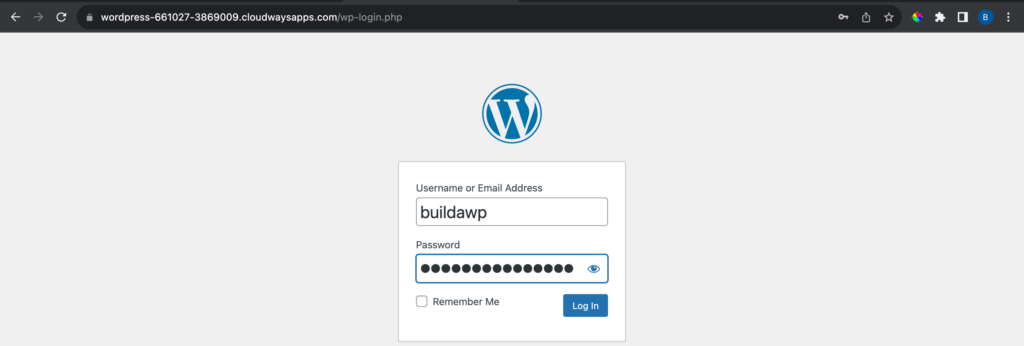
- Go to your websites url (e.g. buildawebs.com) and then type /wp-login.php on the end of the url as you can see below. Then hit enter on your keyboard and a log in box will appear.
- Enter your “Username” and “Password” from your local website and then click “Log In” and you will be logged in to your website
In this tutorial you have learnt how to move WordPress from local server to live website.
Please check out some of our other tutorials
Follow us on
Thank you for reading
Jonathan @ Buildawebs
