Move A Live WordPress Site To Local Server
Learn how to move a live WordPress site to local server in a matter of minutes in this WordPress tutorial.
Why move a Live WordPress Site to Local Server?
When activating a new theme or plugin on your live WordPress website it may not work as expected and can potentially causes issues for visitors. This is where moving a live WordPress site to local server is helpful. You can try out the changes on a local website before implementing them on a live WordPress website.
Did you know using Cloudways hosting you can create a copy of your live WordPress website without using a plugin or having to move a live WordPress site to local server. Cloudways lets you copy/clone your site in a matter of a few clicks and when you have made changes you can push these back to your live WordPress website.
How to move a Live WordPress Site to Local Server
To move a live WordPress site to local server you need to install a plugin. You can then export your live WordPress website and then import the exported website to your local server.
Install the All-in-One WP Migration plugin
A great way to move WordPress from local server to live website is to install the All-in-One WP Migration plugin. You will need to install the plugin on your live WordPress website and then install the same plugin on your local website.
Follow the steps below to install the All-in-One WP Migration on your live WordPress website and then repeat the steps for your local website.
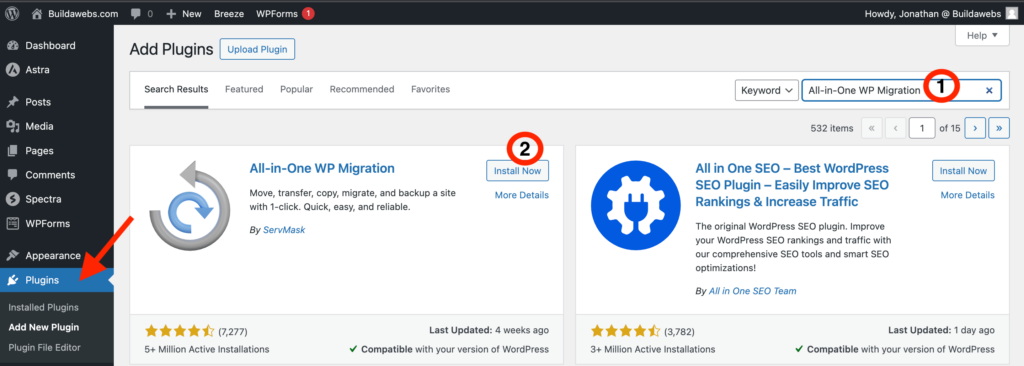
- First of all log in to WordPress and click on “Plugins” on the side menu. You will then arrive on the Plugins page.
- Click “Add New Plugin” at the top of the page and then it will take you to the Add Plugins page.
- Once you have followed the instructions above, search for a plugin by using the search box (1) and it should display on screen. We will search for All-in-One WP Migration.
- Click “Install Now” (2) and the plugin will be installed on the website.
- Click “Activate” (available after clicking “Install Now”) and the WordPress plugin will be live and active on the website.
How to export a WordPress website
Next we will export the live WordPress website and then later import it into the local website. Please make sure you have installed the All-in-One WP Migration plugin so you can do the next steps.
Follow these steps to export your live WordPress website:
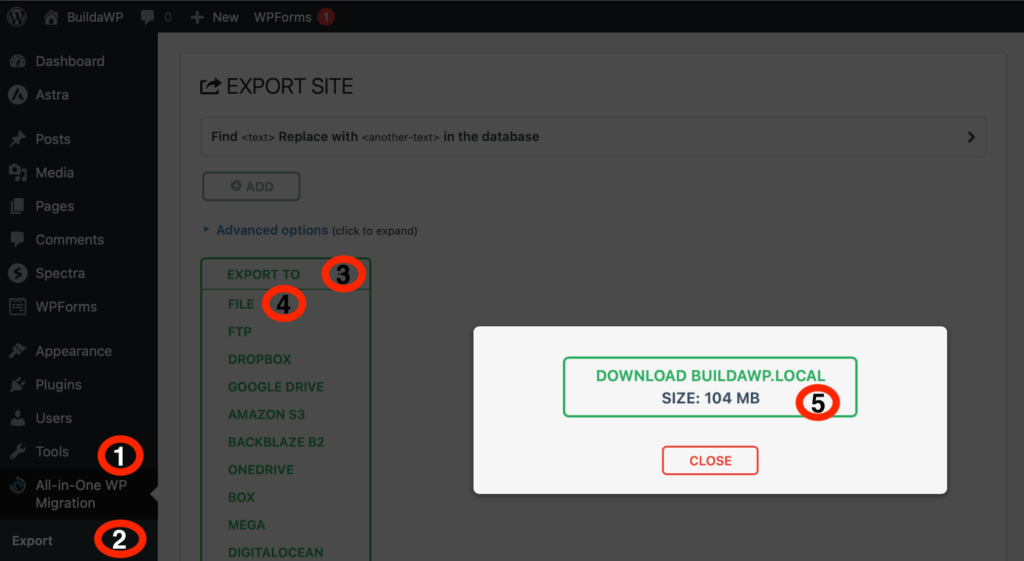
- Click on All-in-One WP Migration (1) on the side menu. Then click on “EXPORT”(2).
- Click on “EXPORT TO”(3) and choose “FILE”(4). After a few moments, click on “Download”(5) and the file will be downloaded to your computer.
How to import a WordPress website
Next we will import the exported website into the local server. Please make sure you have installed the All-in-One WP Migration plugin so you can do the next steps. Click here if you want to install WordPress locally on Mac.
WARNING! The import process will overwrite your website including the database, media, plugins, and themes. Please ensure that you have a backup of your data or you don’t mind it being overwritten before starting the next step.
Follow the next steps to import the exported website to a local website:
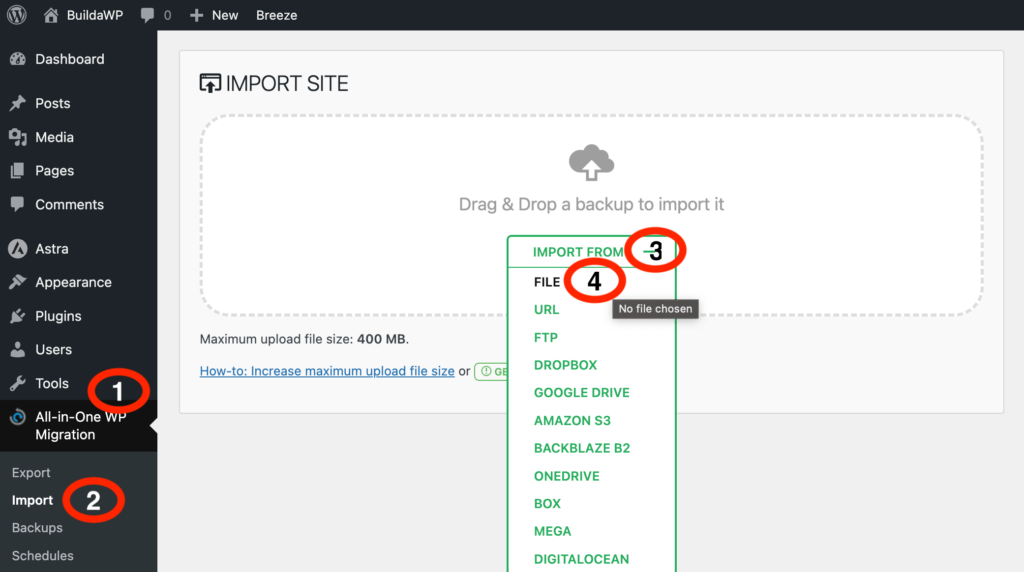
- Click on “All-in-One WP Migration” (1) on the side menu. Then click on “IMPORT” (2).
- Click on “IMPORT FROM” (3) and choose “FILE” (4). Choose the file you downloaded earlier and then it will start to be imported.
- After a few minutes, click “PROCEED” to finishing importing the website. Once the installation has finished, click “FINISH” and then you can view the imported website.
- To view the website, click on the home button in the top left of WordPress.
Once the page has loaded, you will see how you’ve been able to move your live website to local server.
How to log in to your local WordPress website
If you want to log in to your local website, you will need to use the credentials you used to log in to your live WordPress website. This is because the details were imported from the live website.
Follow these steps to log in:
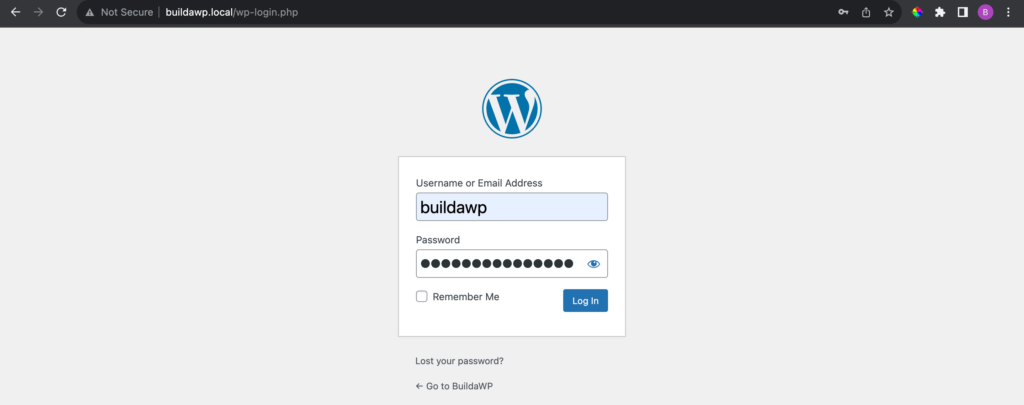
- Go to your your local website homepage and then type /wp-login.php on the end of the url as you can see below. Then hit enter on your keyboard and a log in box will appear.
- Enter your “Username” and “Password” from your live website and then click “Log In” and you will be logged in to your website
Remember with Cloudways hosting you can create a copy of your live WordPress website without using a plugin or having to move a live WordPress site to local server. Cloudways lets you copy/clone your site in a matter of a few clicks and when you have made changes you can click to push these back to your live WordPress website.
In this tutorial you have learnt how to move a live wordpress site to local server.
Thank you for reading
Jonathan @ Buildawebs
Please check out some of our other tutorials
